Problem?
I want to score a movie with a generative supercollider score (that is, insert supercollider patterns and sound effects, ...). How do I sync the sound to what happens in the video? What if I want to last-minute edit the video? Can I automatically resync parts of my audio to the edited video without having to manually edit start and stop times of patterns and sound effects in my supercollider program? I want a reasonably efficient, a non-intrusive workflow, preferably not requiring gazillions of context switches between different tools, with minimal context switching required, and not requiring a calculator to convert between video frame numbers and milliseconds all the time? I want to be able to scrub through the video (either fast, or frame by frame if needed) to find the correct places for starting and stopping sounds, and trigger the starting and stopping of sounds and patterns directly from the video timeline.
Pretty much all of the above (and much, much more) is possible by leveraging existing mature tools and technologies. And this tutorial will explain one way of doing it. Once you understand how it all works, the new possibilities that are created by coupling these technologies are simply overwhelming. The tutorial is developed on Linux, but I will use only cross-platform tools, so you should be able to replicate it on your own system. (Let me know if you tried and if you succeeded :) )
Approach
I will use the most powerful video editor currently available for Linux: the often underestimated Blender Video Sequence Editor (VSE). Blender is at version 2.78c at the time of writing. Youtube has a series of very good VSE tutorials in case you want to dive deeper later on. Blender is fully scriptable in Python 3 and we will exploit these abilities to trigger OSC commands from markers inserted on the blender timeline (this addresses the minimal context switching, video preview, avoiding manually converting video frame numbers to milliseconds). These OSC commands will be received in supercollider and used to start and stop the sounds and patterns.
If you move videos around on the timeline, blender offers a way for you to choose for each marker whether to either keep it locked to its current position, or whether to move it along with the video fragment. This addresses the resyncing after editing part mentioned in the problem statement.
If you move videos around on the timeline, blender offers a way for you to choose for each marker whether to either keep it locked to its current position, or whether to move it along with the video fragment. This addresses the resyncing after editing part mentioned in the problem statement.
In supercollider the OSC messages will be received and used e.g. to trigger patterns or sound effects. We will do this in the language side of supercollider. Sending OSC directly to the underlying sound synthesis server is also possible, but for most purposes way too low-level and complex to be practical.
Python scripting will enable us to add some intelligence to the system: e.g. often needed OSC commands (like start pattern, stop pattern, start sound effect, ...) can be encoded in the marker name, whereas less generic commands can easily be handled by editing the python script embedded in Blender. If this sounds still vague, don't worry. We'll come back to it.
Prerequisites
- Python can be downloaded from https://www.python.org/downloads/.
- Python-osc can be installed with pip, or can be downloaded from https://pypi.python.org/pypi/python-osc.
- Blender can be downloaded from https://www.blender.org/.
- Supercollider can be downloaded from https://supercollider.github.io/.
- The blender and supercollider files used in this tutorial, and an abbreviated version of the movie can be downloaded from google drive. (But it's probably much more rewarding to make something yourself from scratch!)
- The movie I used here can be found on https://archive.org/details/TheSoilers. I downloaded in .ogg format because it's shorter.
Setting up supercollider
We will not spend too much time on setting up supercollider for now, as our first focus is on driving supercollider from blender's timeline. But we need a minimal supercollider program that can receive OSC messages and react to them - if only to test that blender works as expected.
Here's such an example: whenever an OSC message is received, it prints out the message and its arguments. For now react to only 2 messages: "/stap" (shorthand for "/startPattern") and "/stop" (shorthand for "/stopPattern"). The name of the pattern to be started/stopped will be an argument in the OSC message.

Setting up blender
Start blender, and check in the File -> User Preferences -> File tab that "Auto Run Python Scripts" is enabled. This is a convenience setting so we avoid having to manually start the python script we will develop when opening blender and playing back the video. Note that this is convient, but may present a security risk if you install other blender add-ons that you didn't make yourself, so you may want to reconsider. If you don't enable the setting, you will always have to remember to start the python script manually. I'll show how to do that later.

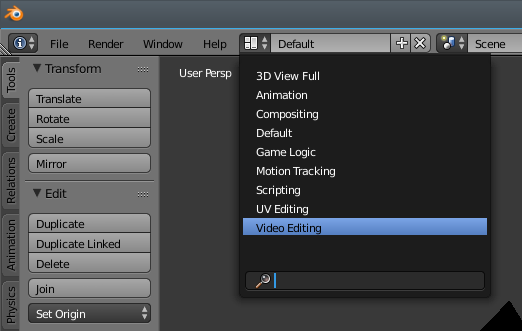
Next, switch to video view in the top menu.
and insert a video on the timeline using the Add menu item just above the timeline.

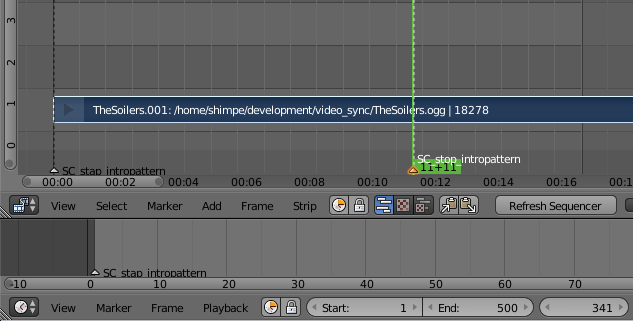
I've selected a random movie file from archive.org (https://archive.org/details/TheSoilers) and importing it shows two strips: the green strip represents the audio stream, and the blue stream represents the video strip.

Let's remove the audio stream (strictly speaking this is not needed, but it's a silent movie so it just takes screen space). Right mouse click on the green strip to select it, then type the X key to delete it (think "eXtract") and confirm the deletion.

Then position the green bar (the playhead) on frame 1 by dragging it by mouse or by setting number 1 in the current frame edit box. As you drag the green bar over the video strip, you can see the movie play in the preview window. This is called scrubbing. It makes for easy finding frames where to start or stop certain sounds or patterns. Next, in the marker menu, select Add Marker (or faster: hover your mouse cursor over the timeline and press the M key).

A marker appeared with the name F_01 (which is shorthand for Frame_01). To rename the marker, right mouse click it in the timeline to select if not already selected, then press ctrl+M on the keyboard to rename it.

We'll rename it in such a way that the name itself tells us which OSC command to send to supercollider. This is just so we can quickly add commands on the timeline later without having to edit Python code all the time (minimizing context switches!). Let's e.g. rename the marker to SC_stap_intropattern. Here, SC_ means that the marker will be interpreted as pertaining to supercollider, "stap" is shorthand for "STArtPattern", i.e. a command we will send to supercollider in the form of an OSC message, and "intropattern" is the name of a pattern that we will later define in supercollider. It will be sent as an argument in the OSC message.

Next, go to frame 341 (you can easily verify in the preview window that this is the last frame before some new text appears). Also, set the end frame to 500. This ensures that we will only render the first 500 frames of the movie (there's no point in rendering more for this tutorial). If you forget to increase the end frame, it will remain at the default of 250 and playback/rendering in blender will not be able to pass beyond the 250 frame limit.
If you find at this point that the video strip was not put in the timeline at frame 1, you can right click on the strip to select it, then type the "g" key for "grab", then type the "x" key to constrain the movement in x direction, then reposition it with the mouse and left mouse click to confirm the new position. Blender has many efficient ways of working with selections and movements, and you will greatly benefit from doing some blender tutorials to get to know all these useful tricks.
If you find at this point that the video strip was not put in the timeline at frame 1, you can right click on the strip to select it, then type the "g" key for "grab", then type the "x" key to constrain the movement in x direction, then reposition it with the mouse and left mouse click to confirm the new position. Blender has many efficient ways of working with selections and movements, and you will greatly benefit from doing some blender tutorials to get to know all these useful tricks.

Now insert and rename a marker SC_stop_intropattern as before: mouse cursor over timeline, M, ctrl+M, SC_stop_intropattern, OK. (Notice how fast this goes?)
Done? Great! We've created some fancy markers, but blender of course has no idea yet that these are supposed to trigger OSC messages to be sent to supercollider. We now have invoke the magic of Python scripting to actually make that happen.
Scripting blender with python
If you haven't done so, install python 3.x from www.python.org, and make sure you have the python-osc module installed. Usually installing a module involves opening a terminal window, navigating to the folder where python is installed, find the pip.exe executable and run on the command line:
pip install python-osc
pip install python-osc
First, switch blender to scripting view on the top menu.

We will add a new python script first. To do so, click the "new" button in the script window.

As soon as you clicked the new button, the menu changes and you can type a name for the script. I chose trigger.py as name. It's important to give a name that ends in .py because that ungrays the register button. Make sure the register button is not grayed and click the checkbox. The effect of "Register" is to run this python script automatically when the .blend file is loaded in the future (but only if you allow automatic running of python scripts in the user preferences). It's just a detail really, but it allows us to work more efficiently in the future.
The black on gray text on top of the screenshot that looks like python code is generated automatically by Blender whenever you click user interface elements. This shows what you would have had to write in python to achieve the same effect as when clicking the user interface elements. You can safely ignore it for this tutorial.

In the gray script area, we can now write down our Python script. The approach I'm going to use is to register a frame_change_pre handler. This is a callback function that is called by Blender whenever the framenumber is increased during playback or dragging the playhead. Note that in order to type into the script area, you need to make sure that the mouse cursor hovers over the gray area. When it hovers over other areas (e.g. timeline), the keyboard keys get other meanings and you may get frustrated quickly :)
In the callback function we will check if animation is running (we don't want to send OSC when simply scrubbing the timeline) and if there's a marker at the current frame number. If one or more markers are found on the current position, check if it is one of the markers that triggers automatic OSC messages, or if it is a marker that has a manually registered OSC message attached to it. In the example code I used manual registration to react to the markers with name "init" and "cleanup" and "explosion" (lines 19-21). Note that explosion is added for demo purposes only. It'd make much more sense to add an automatic marker for triggering synths in supercollider. Marker names triggering automatic OSC commands can also be manually registered in the manual_markers map. In that case both the automatic and the manually registered version are executed.
Blender allows to insert multiple markers with the exact same name so there's no problem to retrigger the same commands multiple times. (The python code allows to add an optional number suffix (which is ignored for OSC generation), e.g._234, to automatic marker names because not everyone feels comfortable having the exact same marker name in multiple places) Blender also allows adding multiple markers on the exact same location, so also there we do not hit any limitations to what is possible in terms of sending multiple commands. Using manual registration, you can also add multiple OSC messages for a given marker. Manual registration boils down to editing the python script.
Blender allows to insert multiple markers with the exact same name so there's no problem to retrigger the same commands multiple times. (The python code allows to add an optional number suffix (which is ignored for OSC generation), e.g._234, to automatic marker names because not everyone feels comfortable having the exact same marker name in multiple places) Blender also allows adding multiple markers on the exact same location, so also there we do not hit any limitations to what is possible in terms of sending multiple commands. Using manual registration, you can also add multiple OSC messages for a given marker. Manual registration boils down to editing the python script.
Blender pitfalls

- Every time you've edited the python script, be sure to press the "run script" button to see the effect. There's a call to bpy.app.handlers.frame_change_pre.clear() to ensure that the same handler is not registered multiple times. If you didn't set up automatic running of python scripts in the user preferences, you need to press this button also after you loaded your .blend file.
- The frame_change_pre handler is not executed in frame N if the playhead starts on frame N.
- Blender playback stops automatically when the end frame is reached. Make sure you set it high enough in the UI
- If you use python scripting, it's best to start blender from the command line as python errors (syntax errors) will be displayed in the terminal from which blender was started
- If you try to type/paste into the script area, make sure the mouse cursor is somewhere hovering over the area. Keypresses are interpreted differently when the mouse is outside that area. Similarly, if you try to save your .blend file with ctrl+s key, be sure the mouse cursor is outside the script area (e.g. hover it over the timeline), otherwise blender will try to save the python code only into a file.
- If you start to move around video strips, you may want the markers to move along (or in other cases you may want the markers to remain where they are). By default, the markers don't move along with the video, but if you check the "sync markers" checkbox in the video editing layout's view menu, all selected markers will move along when you move a video strip. Selecting markers happens by right mouse click in the timeline (on the marker). You can add more markers to a selection with shift + right mouse click. You can select many markers at once by hovering over the timeline with the mouse, pressing b for "box select" and drawing a rectangle over all the markers you want to select. These are common techniques in blender. If you are serious about working with blender, make sure to learn the basics.
Supercollider pitfalls
- If you use Ndef/Pdef/Tdef, you will want to make sure they are quantized to 0, otherwise the sounds may start late and it will ruin the video-frame acccurate timing we're striving for.
- If you redefine the guts of Ndef/Pdef/Tdef, also think carefully about the fadeTime. It may be wanted, or it may cause your sound to mess up.
- Be careful to free resources you don't need anymore or the sound generation might crash before the rendering is finished.
Intermediate test
In supercollider, start the test program that listens for OSC messages. In a real-life situation you would also want to make sure some DAW is set up for recording the audio generated by supercollider.
In blender, set the current frame to 0. Because of pitfall #2 in the list of Blender pitfalls listed above, since we added a marker on frame 1, we should start playback from frame 0, since otherwise the first OSC message will not be sent. I've found there's no need to also set the start frame to 0 for this: setting the current frame is enough.
In blender, set the current frame to 0. Because of pitfall #2 in the list of Blender pitfalls listed above, since we added a marker on frame 1, we should start playback from frame 0, since otherwise the first OSC message will not be sent. I've found there's no need to also set the start frame to 0 for this: setting the current frame is enough.
When everything's set up click the play button in blender. In Blender, you should see the playhead progress over the timeline, and if you are in video editing mode you should see the video play in the preview window. In the supercollider "Post window" you should see the OSC messages appear as dictated by the markers at frame 1 and frame 341. Playback will automatically stop when the end frame number is reached. Make sure to set the end frame number high enough! (blender pitfall #3)
Performance considerations
Blender allows you to add many video strips and to make complex transitions between video strips. You can also project one or more movies on 3d objects, and even insert and render complete 3D scenes in multiple layers. For truly complex scenes, the actual rendering can take up to several hours per frame. Clearly this does not match with the requirement of sending supercollider commands to generate audio in real-time... Add to that that supercollider may also need considerable CPU power to generate its sounds. Can we somehow solve this!?
Think about it... the only thing that drives supercollider are the inserted markers. And the markers are not tied to a video or scene, they are tied to the timeline. Once all your markers are set up in the right places and with the right names you can remove or mute all video strips and blender 3d scenes (save a backup first!!!) and just let blender run with the empty timeline (that is: empty except for the markers).
The markers will instruct supercollider to generate sound at the right moments in time with negligible CPU usage from Blender, and you can record the resulting sound in a digital audio workstation (e.g. on Linux, ardour is a perfect match since the JACK protocol allows for routing the sound out of supercollider and into ardour directly, and since both Blender and Ardour support the JACK transport protocol, you can later on also easily mix in music and samples from other sources than supercollider).
Finally add the recorded audio as an audio strip on top of the original scene/video (here's where you will be happy to have made a backup ;) ) and render the whole to a final movie + sound (at glacial speeds if necessary, but for a simple video like the one we made here on recent enough PCs none of this performance tuning is really necessary. Everything runs happily in real-time.
A working example
Let's turn our supercollider test program into something that actually produces sound. I'll add support for the init, clean and synth commands that are used in the rest of the article as well. I'll leave it up to you to edit the blender time line to trigger some of the newly supported commands, and to add support for new commands as you need to perform your tasks. Be careful about the explosion sound... IT'S LOUD!!!!!


No comments:
Post a Comment